Titan Broadcast Package Tutorial
Initial Setup & Fonts
Before beginning, please have the following links downloaded and installed:
Once you have these downloaded, I recommend putting the Broadcast Asset Package folder somewhere you can easily access on your PC. Then, open your OBS and import the .json file included in your Broadcast Asset Package.


Once you have switched your OBS into the Titan Broadcast Scene Collection, ensure that all of your OBS files are linked to the folder [Broadcast Package > Assets] you downloaded earlier. If there are any assets that you can’t seem to link, contact your Director to determine which files you might be missing. Also ensure that all fonts have been downloaded and installed.
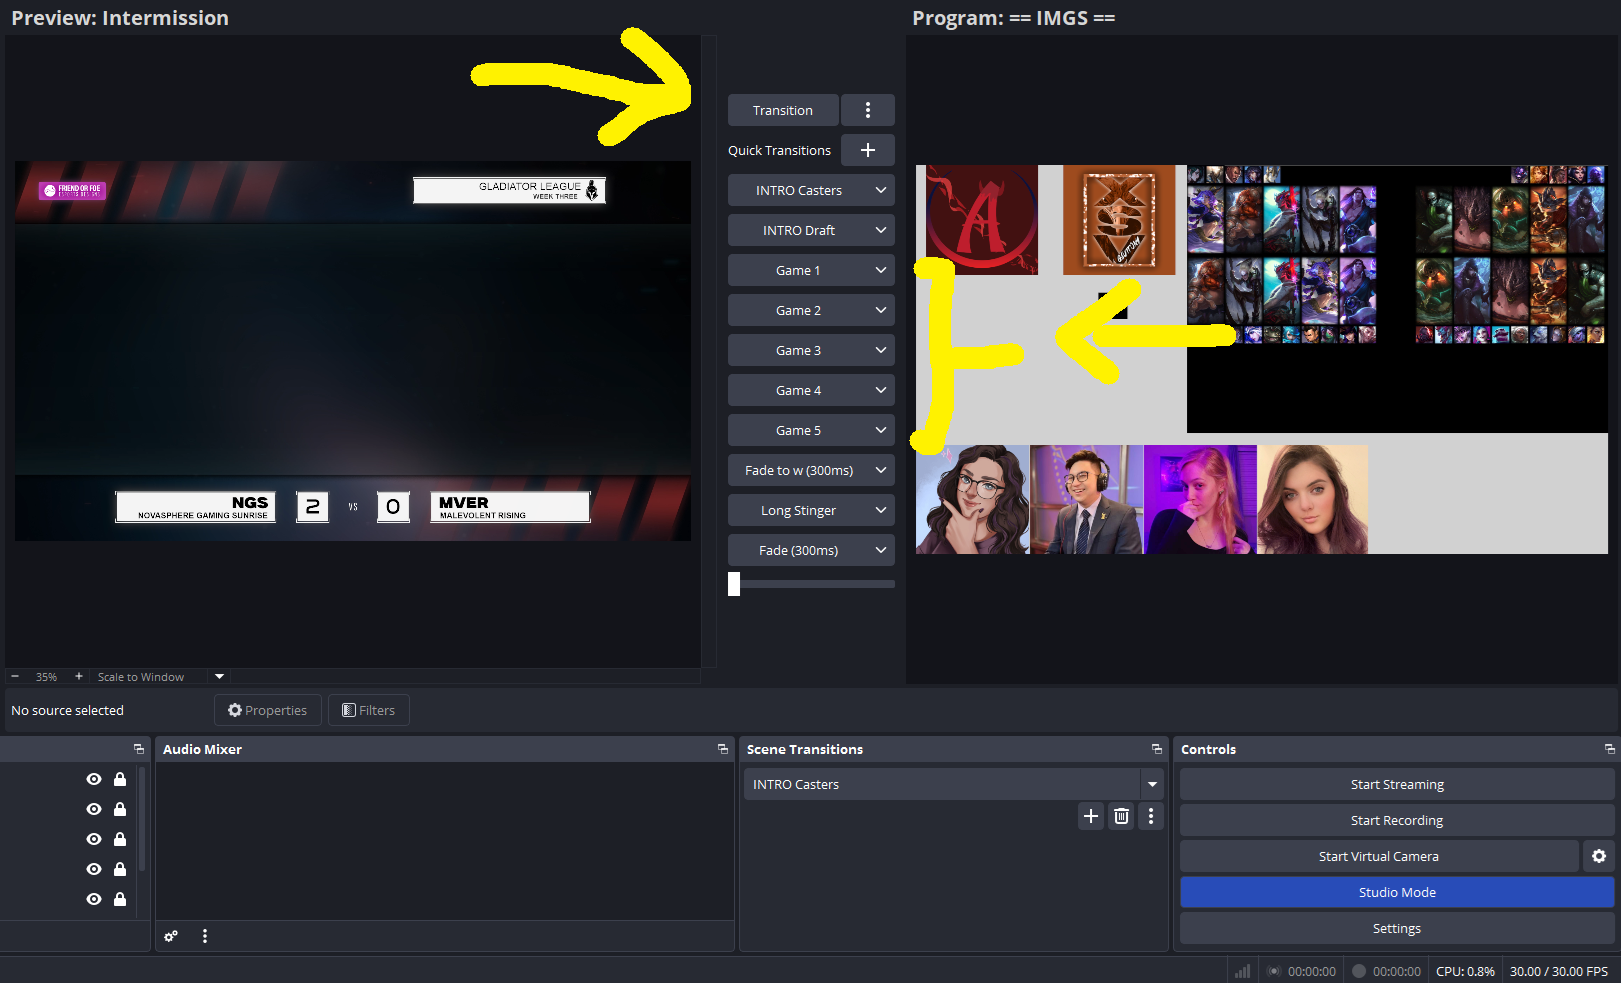
In OBS, I recommend keeping yourself in Studio Mode. If you are unfamiliar, this makes it so you can edit or check other scenes without interrupting the main broadcast feed. If you press the ellipses [ ⋮ ] next to the “Transition” Button in the center, I recommend you turn off “Duplicate Scene”, and turn on “Swap Preview and Program”. Lastly, I recommend placing your widget windows like I have arranged here. The amount of scenes that exist in this package can be overwhelming, so I prefer to have them listed off to the side.

When you are screensharing OBS through discord, right-click somewhere in the “Program” window (the screen that displays what your stream audience sees) and select “Open Fullscreen Projector”. This will create an extra window of JUST what the stream looks like. You can screenshare this window through Discord to your commentators, or use whatever methods you would like.

Setup Scenes & VDO Ninja Explained (Caster Cameras)
Now that we have our Scene Collection imported, I will go through the Setup Scenes that you can see at the top of the Scene List. Starting from top-to-bottom, the first scene is called == IMGS ==, and this scene does not need to be edited unless specifically instructed to do so by your Lead Producer.
≫ SET REMOTE FEED
In this Scene, you will open the properties of the “Remote Feed” Source in the Source Panel and make sure you have the YouTube or Twitch link given to you by your Remote Observer entered in correctly. You will then select that Source again, and select “Interact”. In the new window that pops up (that acts like a normal browser window), you will activate full screen mode from their feed. You shouldn’t have to touch their feed again throughout the stream after inputting this correctly.
At this point, you should be ready to go back to Intermission and start editing the Google Sheet for the next game. If the commentators would like to talk for a longer period of time after the game ends, you can use the Caster [no intro] Scene.
Filler Scenes
Lastly, you might be provided with a few filler scenes. These can be used in case your commentators would like to fill time with something visually displayed on screen. Use these at your own discretion.


The Middle Section is where we input all of the Roster information and Player Stats. The only things you’ll need to edit in this section are the Scores and the Side Selection, which is activated by a checkbox. The rest is handled by the Tournament Organizers. At the bottom of this section is a place for you to input Fearless Champions, which can easily be copied and pasted from the Draft Section.
The Right-Most Section contains “Stream Cards”. These are special graphics that you can display in-game at any time if you are using a StreamDeck.

Transitions Explained
When you are in Studio Mode, a list of Transitions should be displayed in the middle. And at the top, should be the “Transition” button. The Transition button can be used while going down the list of Scenes from Intermission to Victory. You’ll notice that the Transition Button automatically plays the correct transitions whichever scene you go to. You can use the Transition Button every time you switch scenes EXCEPT FOR going from Draft Scene to Game Scene. For this specific instance, you will use the Game 1, Game 2, Game 3, etc… Transitions, which can be found in the middle of OBS Studio. Other than that, every other instance of using the Transition Button to another scene should result in a pre-determined transition being played.
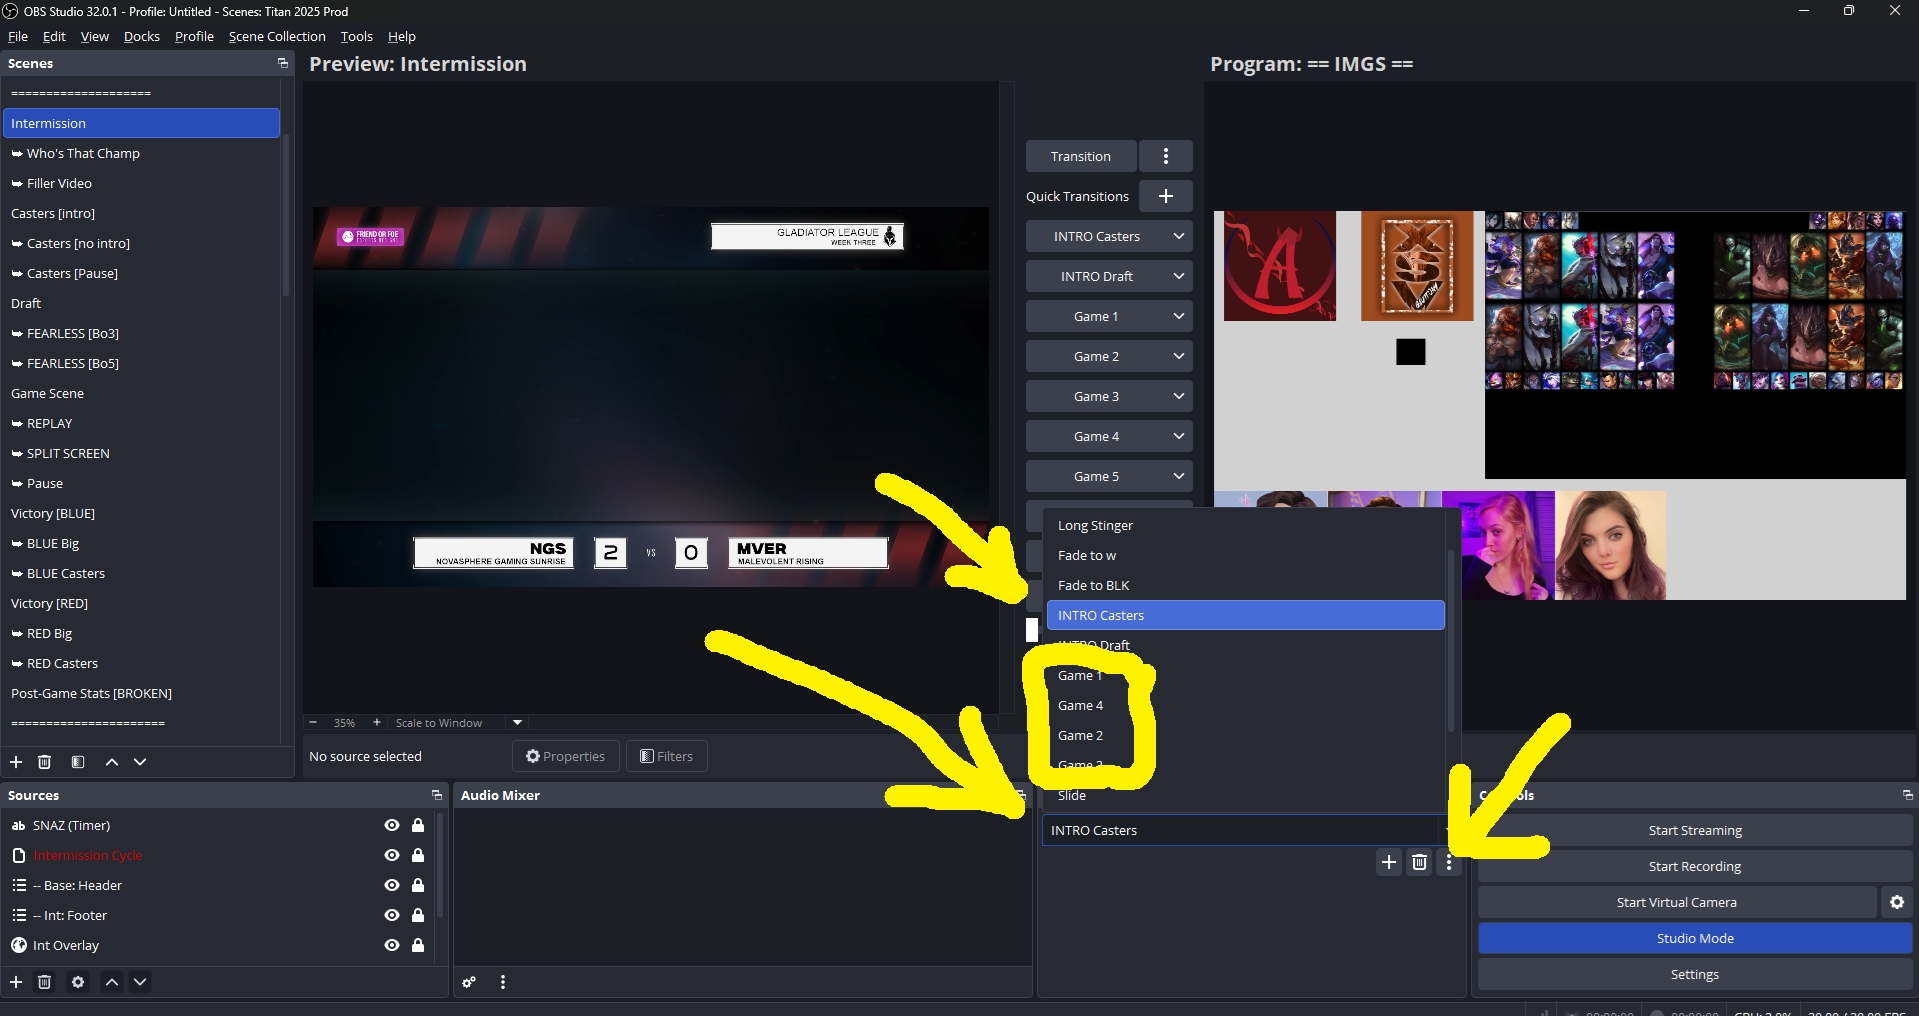
In the Scene Transitions Panel, you will need to ensure that your Intro Transition and your Game Transitions are set correctly. To do so, select “INTRO Casters” from the dropdown menu, then click the ellipses button [ ⋮ ].
Make sure that the file your Intro Transition is linked to matches whichever League you are streaming for the day.
For Best-of-1 versus Best-of-3, you can select “Game 1/2/3” from the dropdown menu, click the ellipses [ ⋮ ] button, and change the Transition to “Bo5 Game 1/2/3”. Ensure all of your transitions are accurate before streaming.

Run of Show / Scenes Explained
The Run of Show goes like this: Intermission > Casters [intro] > Draft > Game Scene > Victory Scenes > Repeat. Here is an explanation of what to do in each scene:
Intermission Scene
Here is where you will be doing most of the behind-the-scenes work while the audience waits for the next game. I heavily recommend completing all of the below tasks before transitioning into the Casters [intro] Scene.
Enter the Game Lobby and ask for the Draft Link
Ensure that the Google Sheet to OBS plugin is running properly
Ensure Caster Cameras are coming through cleanly
Ensure Caster Audio is linked in OBS (Discord Audio)
Ensure you are Screensharing your OBS feed to your commentators
In Google Sheets:
Wait for the Draft Link to be completed and enter the information into the Titan Broadcast Control Sheet
Make sure Fearless Draft is accurate
Make sure the Team Scores are accurate and Side Selection has been swapped if needed
As of 10/21/2025, ensure that all players have Streamer Mode turned off
Casters [intro] and [no intro]
When you first transition to “Casters [intro]”, you will see that an intro animation plays along with some music. The animation and music will eventually fade into the commentators’ camera and voices. Every time you transition to this specific scene, that intro sequence will play. If you ever need to GO BACK to the Casters after you’ve already played this intro, there is another scene tagged [no intro] that you can transition to. Use both of these scenes with your best judgement.
Victory Scenes
There are two ways you can do Victory Scenes, depending on how comfortable you are with doing quick transitions:
Easy Way: When the game is over and you see the words “Victory” on screen, you can do a “Long Stinger” transition to the Scenes “> Blue Casters” or “> Red Casters”, depending on the winner.
Cooler way: When the Nexus is about to explode, use the “Transition” button to go down the following scenes in sequence to simulate a long animated transition:
Victory [Blue/Red]
BLUE/RED Big
BLUE/RED Casters


≫ GAME 1 [MAIN] & ≫ GAME 2 [REPLAY]
The next two Setup Scenes are called ≫ GAME 1 [MAIN] & ≫ GAME 2 [REPLAY]. In the sources panel of these scenes, you’ll be able to turn on-and-off your Game Feed and the Remote Observer’s Game Feed. If you are working by yourself with no other remote observers, then make sure your personal game feed is coming through the ≫ GAME 1 [MAIN] Scene. If you are working with a remote observer and will have replays, you can switch the sources in both ≫ GAME 1 [MAIN] & ≫ GAME 2 [REPLAY] scenes. In short, this makes it so that the main footage of the game that your audience sees will be your Remote Observer. While anytime you do “Replays”, the audience will see your personal Game Feed.

≫ CAM A & ≫ CAM B
The next two scenes are called ≫ Cam A, and ≫ Cam B. This is where we will be inserting our commentators' cameras. Using the website VDO.ninja, you will Create a Room and follow the settings you see below. When you launch the room, you will be given a link that you can copy and paste to your commentators. When they join the room, below their cameras will be a link that you will copy and paste into the ≫ Cam A, and ≫ Cam B Scenes. If done correctly, the commentators’ cameras should appear in both the Setup Scenes as well as a few of the Main Scenes. If you are working with a Remote Observer, you can create another room in VDO specifically for just you and your Remote Observer to communicate with each other.


≫ GAME COUNT
This scene is where you will edit whether the series is a BO3, BO5, or BO1. Here, you will simply toggle the source for the series-count that you need.

Plugins Explained
Now that we have our OBS Scene Collection properly set up, download and install all of the plugins included in your Broadcast Package [Broadcast Asset Package > Plugins]. There are four plugins we primarily use; three of which are easy to install:
Source Switcher
Simply run the installation of this Plugin and it will do the rest
This Plugin is essentially a strong Slideshow Plugin
Move Transition
Simply run the installation of this Plugin and it will do the rest
This Plugin allows dynamic movement and animation for certain Transitions
Snaz
Simply run the installation of this Plugin and open the “Snaz” program when installed.
This Plugin is a controller for the Intermission Timer/Countdown
How to Use:
In the “Chronos” tab, adjust the settings like the diagram below
When you have selected a time to start the countdown, you can press “Start” to show the countdown on the Intermission Screen
Press “Stop” to hide the countdown before changing the time.

Google Sheet to OBS
This is the hardest plugin to install. Once you’re past this, you’ve made it through the most difficult part of this setup. Follow these instructions:
Make sure you have Node.js downloaded/updated
In Broadcast Asset Package > Plugins > obs-google-sheet-importer-master, right-click somewhere in the folder and “Open in Terminal”. This should open in PowerShell or something equivalent.


Game Scene / Replays
If you are using a remote observer, their Game Feed should be the Main Feed, while your Game Feed should be the Replay Feed. In order to execute a replay, rewind the Replay Feed to the designated time in the game and turn off all HUD visual in League of Legends (or press “A”). While your Main Feed is being shown on stream, queue/select the Replay Scene, and then press “Transition” when you are ready to start the replay. The stream will now switch to YOUR Game Feed, and you will control the camera until you are ready to switch back. When you are, pressing “Transition” immediately should bring the stream straight back to the Main Feed that your Remote Observer is controlling. If this does not happen, make sure that “Swap Preview/Program” is turned on in the ellipses next to the Transition button.
If you use a StreamDeck, there are many extra features that can be used in this scene. Otherwise, they are not mandatory.


3. In Terminal, type “npm install” and press enter. The following should appear.

4. Back in the folder, there should be two .json files named config.json and config-dist.json. Open one of them (in Notepad, or any text-editing program) and ensure that the text says the string below. Afterwards, save it, and ensure that this is the text for BOTH FILES:
{
"sheetId": "10QOkRGFAHPcbPGRhE6rGNYQCI37afJgUBERkOlmvRBI",
"tabname": "CHRIS", [CHANGE TO YOUR NAME]
"range": "A1:Z100",
"dimension": "COLUMNS",
"apikey": "AIzaSyAPqzVSm3ZatJVaFpsUKIgoPXj8cGrHIHI",
"obsaddress": "ws://localhost:4455",
"obsauth": "",
"polling": 5000
}
5. In OBS Studio, under Tools > WebSocket Server Settings, copy the following settings:

6. Back in the obs-google-sheet-importer-master folder, there’s an application called “Start”. Assuming all of the above went well, starting it should look like this:

If the application looks similar to the above image, then everything will update in real-time. Specifically, every 5 seconds, this application will grab any text from the Titan Broadcast Control Sheet and will slap it onto your stream. If this ever crashes mid-stream, reloading the application is a good rule-of-thumb. In the event that none of the above worked for you, contact Chris Sunga.
Google Sheets Explained
Our Broadcast’s live text and images can be edited via the Titan Broadcast Control Sheet. Here, you will find the tab on the bottom with your name on it. Select that tab, and from here on, you should familiarize yourself with the contents of this sheet. Here is where all text and images can be edited.

Starting with the Left-Most Section, here is where you will input the champions selected during the Draft Phase of a match. The Draft Section is divided into three sections – Ban Order, Drafted Order, and Final Order. The Final Order refers to the Top-Jungle-Mid-Bot-Sup line up that professional games use. So after the Draft Phase, you will input the “Final Order” yourself. At the bottom of this section is “Last Game’s Draft”. Here, you can copy and paste the champions you entered in the last draft. This will result in an extra filler scene in OBS that displays the previous draft.
Draft Scene / Fearless Draft
Once you’ve entered the Draft and Fearless Champions in the Google Sheet, transitioning into the Draft Scene will be almost seamless. As long as your entries are accurate, the draft will automatically play itself out over the course of five minutes. The only thing to keep in mind is the option to show “Final Picks”. You can do so in the Sources panel by unhiding the Source “Final Picks”. If you use this, remember to turn this off before the next draft. Showing the final order is also not mandatory if you’d prefer to not think about it.


